Preparing the Device
![]() Download this manual (.PDF, 974 Kb)
Download this manual (.PDF, 974 Kb)
Unpacking
-
The following steps must be performed before using the device:
- Soft Carry Bag
- USB-C cable
- Manual
- Cloth
-
Make sure that nothing is missing.
-
Inspect the device for damage to optical surfaces, body, eyecups, operation buttons, etc.
-
Ensure that all optical surfaces are clean and ready for use.
NOTE:
If any accessories are missing or broken contact ATN Europe LTD’s Customer Service at support@atneu.com
Charging the device
The device is equipped with a USB (type C) port for charging. You will find it under the rubber cap on the right side of the device.
We have included a USB (type C) charging cable with your monocular. Plug the cable into a USB wall charger that has an output of 2 amps (Wall Charger not included).
Charge your monocular for 6 hrs using a 2 A USB wall charger. Note using a wall charger with lower amperage will take longer to charge your scope.
- Recommended charger is 2 A USB charger.
- Battery charging time (from 0 to 100%) is 6 hours with 2 A USB charger.
- Battery run time is 10 hours on a single charge.
ON / OFF
To Turn On the device press and hold the Power button until you see the ATN Homescreen.
To Turn Off the device press and hold the Power button.

If the scope freezes or stops responding to the control panel. Press and hold the Power button for 1-2 seconds to reboot the scope.
Using your keypad
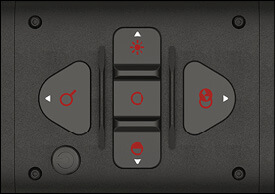
The keypad is programmed to be used in two different ways:
- Short and Quick Taps — used for most functions and to navigate the menu.
- Press and Hold — designed to be used in the following situations — On/Off, Menu.
Focusing
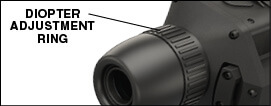
DIOPTER ADJUSTMENT
By rotating the Diopter Adjustment Ring you will achieve optimal sharpness for your vision. Look through the eyepiece while focusing on the widgets on the screen.
NOTE:
Once the Diopter Adjustment is set to your liking, adjustment will not need to be performed unless another user altered the focus for their needs.
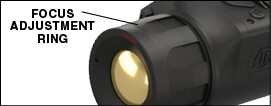
DISTANCE FOCUS
Rotate the Adjustment Ring, as necessary, to achieve the proper focus at various distances.
Interface
Main operations
OPERATION WITH KEYPAD
- On/Off button; A long press of this button (1–2 seconds) will either power on the unit or power off the unit, depending on the current status of the monocular.
- Up button; A short press of this button will cycle you through your change in zoom (3–6x or 4–8x).
- Left button; A short press will allow you to perform a contrast image cycle change (1 → 2 → 3 → 1).
- OK button; A short press of this button will perform a manual NUC. A long press (1-2 seconds) will open the Menu.
- Right button; A short press allows you to adjust the brightness of your micro display screen (100% → 60% → 30% → 10%).
- Down button; A short press will change your thermal mode from White Hot to Black Hot.

NOTE:
When you press the keypad buttons that change device settings (e.g. Contrast, Brightness) you will see in the lower right corner relevant information icons and level number appear for 2-3 seconds.
Homescreen
The first screen you’ll see after turning on the device is the Homescreen. It contains Status Bar icons and different Information Widgets.

Menu
To open the Menu, perform a long press of the OK button (1 to 2 sec) until you see the Menu appear on the left side of the screen. You will see the following Icons:
NUC. This feature allows you to turn On/Off the auto NUC feature.
PIX. This feature is intended to correct neutral pixels in the display. Select the option by using the OK button when PIX is highlighted.
Move the dot to the area of the display with the neutral pixel, and place the flashing dot directly over the neutral pixel. A short press of the OK button will select that pixel for repair. After the short press of the OK button to select the pixel for repair, a long press of the OK button will exit the pixel correction mode.
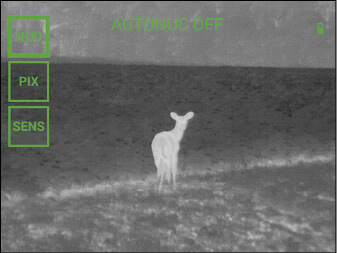
SENS. This option gives you the ability to adjust the thermal sensitivity of your monocular.
How to perform a NUC
NUC’ing helps to improve the image quality when the image is degraded by various environmental factors. There are multiple NUC tables that span the full operating temperature range, and the monocular automatically selects the optimum table based on its temperature.
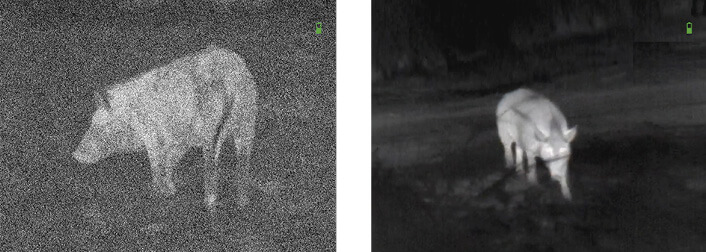
You can set the system to perform a NUC automatically at a predefined time interval. Or, you can turn the automatic NUC off and NUC the system manually, when required. Also, you can use the NUC shortcut from the Homescreen by quickly pressing the OK button anytime.
Example: Change of temperature, continuous viewing of a particular warm object, and movement from one environment to another all may cause image degradation.
In order to turn the automatic NUC On or Off. Press and hold the OK button for the menu to display. Using your Down Arrow button, scroll to NUC. Press the OK button to enter the NUC menu. Press the Up button to cycle the NUC On or Off. Press and hold the OK button to exit the Menu. You can also manually NUC the scope from the Homescreen by quickly pressing the OK button.
Thermal
CONTRAST — the difference in luminance and color that makes an object more distinguishable. You can change the contrast by quickly pressing the Left Arrow button to cycle through the preset contrast settings.
THERMAL SENSITIVITY — Allows you to select how sensitive the Thermal Sensor is in picking up thermal heat signatures.
In order to change the Thermal Sensitivity, press and hold the OK button.
When the Menu appears, use the Down Arrow to select SENS. Press the OK button to enter the Thermal Sensitivity Menu. Press the Up button to cycle through the sensitivity options. Once you select the Thermal Sensitivity you would like to use, short press the OK button to save your selection. Press and hold the OK button to exit the Menu.
Warnings and cautions
- Always remember to turn off the device when it is not in use.
- Do not disassemble, drop, open, crush, bend, deform, puncture, shred, microwave, incinerate, paint or insert foreign objects: it will void your warranty.
- Keep the scope in the provided protective cover when not in use.
- Avoid contact with dust, steam, and gas.
- This product contains natural rubber latex which may cause allergic reactions.
- The scope is a precision electro-optical instrument and must be handled carefully.
- Do not scratch the external lens surfaces or touch them with your fingers.
NOTE:
Failure to follow these safety instructions could result in damage to the device!
3 Year product Warranty
This product is guaranteed to be free from manufacturing defects in material and workmanship under normal use for a period of 3 (three) years from the date of purchase. In the event a defect that is covered by the foregoing warranty occurs during the applicable period stated above, ATN, at its option, will either repair or replace the product, and such action on the part of ATN shall be the full extent of ATN’s liability, and the Customer’s sole and exclusive remedy. This warranty does not cover a product (a) used in other than its normal and customary manner; (b) subjected to misuse; (c) subjected to alterations, modifications or repairs by the Customer or by any party other than ATN without prior written consent of ATN; (d) special order or “close-out” merchandise or merchandise sold “as-is” by either ATN or the ATN dealer; or (e) merchandise that has been discontinued by the manufacturer and either parts or replacement units are not available due to reasons beyond the control of ATN. ATN shall not be responsible for any defects or damage that in ATN’s opinion is a result from the mishandling, abuse, misuse, improper storage or improper operation, including use in conjunction with equipment which is electrically or mechanically incompatible with or of inferior quality to the product, as well as failure to maintain the environmental conditions specified by the manufacturer. This warranty is extended only to the original purchaser. Any breach of this warranty shall be waived unless the customer notifies ATN at the address noted below within the applicable warranty period.
The customer understands and agrees that except for the foregoing warranty, no other warranties written or oral, statutory, expressed or implied, including any implied warranty of merchantability or fitness for a particular purpose, shall apply to the product. All such implied warranties are hereby and expressly disclaimed.
LIMITATION OF LIABILITY
ATN will not be liable for any claims, actions, suits, proceedings, costs, expenses, damages or liabilities arising out of the use of this product. Operation and use of the product are the sole responsibility of the Customer. ATN’s sole undertaking is limited to providing the products and services outlined herein in accordance with the terms and conditions of this Agreement. The provision of products sold and services performed by ATN to the Customer shall not be interpreted, construed, or regarded, either expressly or implied, as being for the benefit of or creating any obligation toward any third party of legal entity outside ATN and the Customer; ATN’s obligations under this Agreement extend solely to the Customer.
ATN’s liability hereunder for damages, regardless of the form or action, shall not exceed the fees or other charges paid to ATN by the customer or customer’s dealer. ATN shall not, in any event, be liable for special, indirect, incidental, or consequential damages, including, but not limited to, lost income, lost revenue, or lost profit, whether such damages were foreseeable or not at the time of purchase, and whether or not such damages arise out of a breach of warranty, a breach of agreement, negligence, strict liability or any other theory of liability.
PRODUCT WARRANTY REGISTRATION
In order to validate the warranty on your product, ATN Europe LTD must receive a completed Product Warranty Registration Card for each unit or complete warranty registration on our website at www.atneu.com. Please complete the included form and immediately mail it to our Service Center: ATN Europe LTD, Bulevard Tsarigradsko shosse 7-11 km. Parking lot of METRO 1 store, Sofia Bulgaria 1784.
OBTAINING WARRANTY SERVICE
To obtain warranty service on your unit, End-user must notify ATN Europe LTD service department by calling +359 884974545 or via e-mail support@atneu.com to receive a Return Merchandise Authorization number (RMA).
When returning please take or send the product, postage paid, with a copy of your sales receipt to our service center, ATN Europe LTD at the address noted above. All merchandise must be fully insured with the correct postage; ATN Europe LTD will not be responsible for improper postage or, missing or damaged merchandise during shipment.
When sending product back, please clearly mark the RMA# on the outside of the shipping box. Please include a letter that indicates your RMA#, Name, Return Address, reason for service return, Contact information such as valid telephone numbers and/or e-mail address and proof of purchases that will help us to establish the valid start date of the warranty. Product merchandise returns that do not have an RMA listed may be refused or a significant delay in processing may occur. Estimated Warranty service time is 10-20 business days. End-user/customer is responsible for postage to ATN Europe LTD for warranty service. ATN Europe LTD will cover return postage/shipping to European Union countries end-users/customers after warranty repair only if product is covered by aforementioned warranty. ATN Europe LTD will return product after warranty service by domestic TNT ground and/or domestic mail. Any other requested, required or international shipping method the postage/shipping fee will be the responsibility of the end-user/customer.
